This week, we’re going to break down the importance of heart rate based training. Recently, we have been focusing more on heart rate fluctuations with our individual clients, and we’ve also been encouraging our group members to check in on where their heart rate actually goes during a training bout.
Most people train based on how they feel. While that’s important, it doesn’t always tell the full story. Heart rate provides us with objective feedback about how hard your body is actually working.
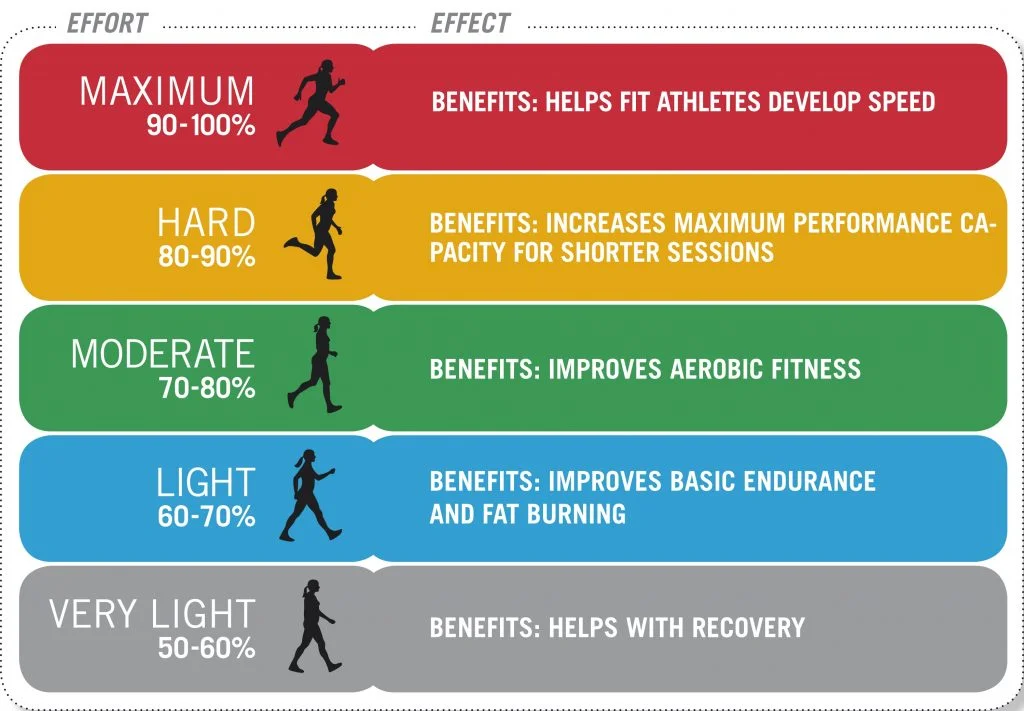
Below is an example of zones for an individual with a MAX HR of 180 BPM:
Why is it so important to know these zones? Zones are a way to understand how your body is using energy and what the adaptation and stimulus actually is. Zones are based on effort, not pace. Knowing your zones and applying them properly can help your body burn more fat at higher outputs, and stimulate mitochondrial development and efficiency.
Now here’s where it gets even more important: Not all zone calculations are created equal.
Most generic zone charts are based only on your estimated max heart rate. While that gives you a rough idea, it doesn’t account for your resting heart rate– and that matters. This is where Heart Rate Reserve (HRR) comes into play.
Heart Rate Reserve is the difference between your maximum heart rate and your resting heart rate. In simple terms:
HRR = Max HR – Resting HR
Instead of assuming everyone starts from the same baseline, HRR personalizes your zones to how your body actually functions. Two people could both have a max heart rate of 180, but if one has a resting heart rate of 50 and the other sits at 70, their training zones should not be the same.
When you calculate your zones using Heart Rate Reserve, you get a much more accurate picture of what zone 2 or zone 4 actually is for you. That precision helps you avoid undertraining, overtraining, and spending too much time in that “gray zone” where you’re tired but not improving.
Being intentional with different effort levels– and when you use them– can help you get fitter faster. For example, if you have limited time and want to improve fat metabolism and aerobic efficiency, you might aim to spend more time in zone 2 to get the most bang for your buck. On the other hand, if you’re trying to set a new 5K PR, you’ll need workouts in zones 3–5 to build speed and power. But you also have to use zones 1–2 to absorb and recover from those hard efforts.
The best way to determine your true heart rate zones, especially if you want to use Heart Rate Reserve, is by wearing a heart rate monitor consistently for about two weeks. This allows you to track trends, identify a reliable resting heart rate (measured first thing in the morning), and establish a realistic maximum. From there, your zones become far more individualized and far more useful.
Here are a few examples of training protocols we use and what zones you should be striving for during these sessions:
| TRAINING PROTOCOL | HR ZONES | EFFECT |
| Strength Training | Z1-2, Z4 | The bulk of strength training sessions should be spent in Z1. The effort of an actual set will peak into Z4/5, but we need to prioritize recovery between sets to maximize STRENGTH GAIN. |
| HIIT (15 on/off, 45/15 on off, tabata, etc.) | Z3-5 | HIIT is designed to increase your lactate threshold. We must push our HR to a point of discomfort to achieve a training benefit. You should feel exhausted after this type of session. |
| Walking/Tempo Running | Z2 | These two activities are best operated in Z2 as they burn the most fat and are easily scalable to individual needs. |
| Power Training (training for athletes, 15/45 on/off intervals, AGT) | Z4-5 | Power training is where we want to reach our redline of top-end HR, then allow just enough rest to recover then repeat as many times as possible until we cannot recover under 3 minutes. |
This hopefully clears up some of the questions some of you have about heart rate, but as always, we’re open to hearing more questions!
Yours in health,
Nick